ProductivitySuite Software Features
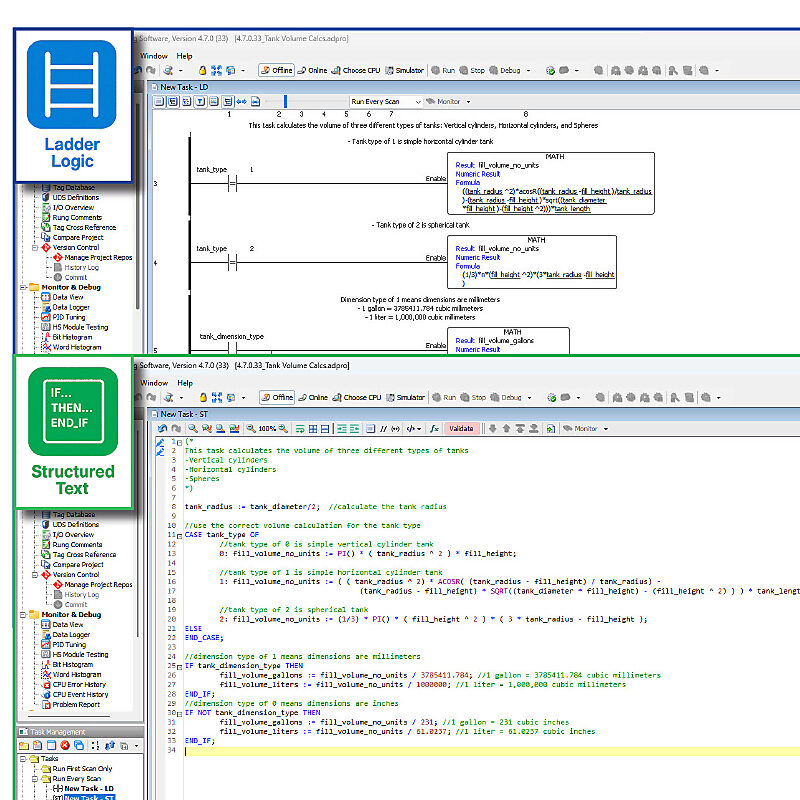
Two programming styles. One power platform!
Productivity PLC software is now even more powerful, adding Structured Text programming alongside the Ladder Logic you already know and trust. This enhancement gives you the flexibility to choose the best programming method for each application?without changing tools or workflows. Mix Structured Text and Ladder in the same project to handle everything from simple I/O to advanced logic, all within the familiar, easy-to-use Productivity environment. And, as always, you get all this power for none of the price, since Productivity Suite is completely FREE!
Why ladder logic?
Ladder Logic is ideal for applications where simplicity and clarity matter.
- Intuitive and time-tested - The industry standard for PLC programming, especially for discrete control
- Easy to troubleshoot - Visual logic makes it simple to monitor I/O and diagnose problems in real time
- Maintenance-friendly - Familiar to technicians and electricians on the plant floor
- Fast to implement - Ideal for traditional machine control, interlocks, and safety-related logic
Why Structured Text?
Use Structured Text where power and efficiency count.
- Ideal for complex logic and math - Efficiently handle calculations, loops, arrays, string handling, and advanced algorithms
- Cleaner, more compact programs - Express sophisticated control strategies with fewer lines of code
- Familiar to modern programmers - High-level, text-based syntax appeals to engineers with experience in traditional programming languages
- Power where you need it - Perfect for applications that go beyond straightforward discrete control
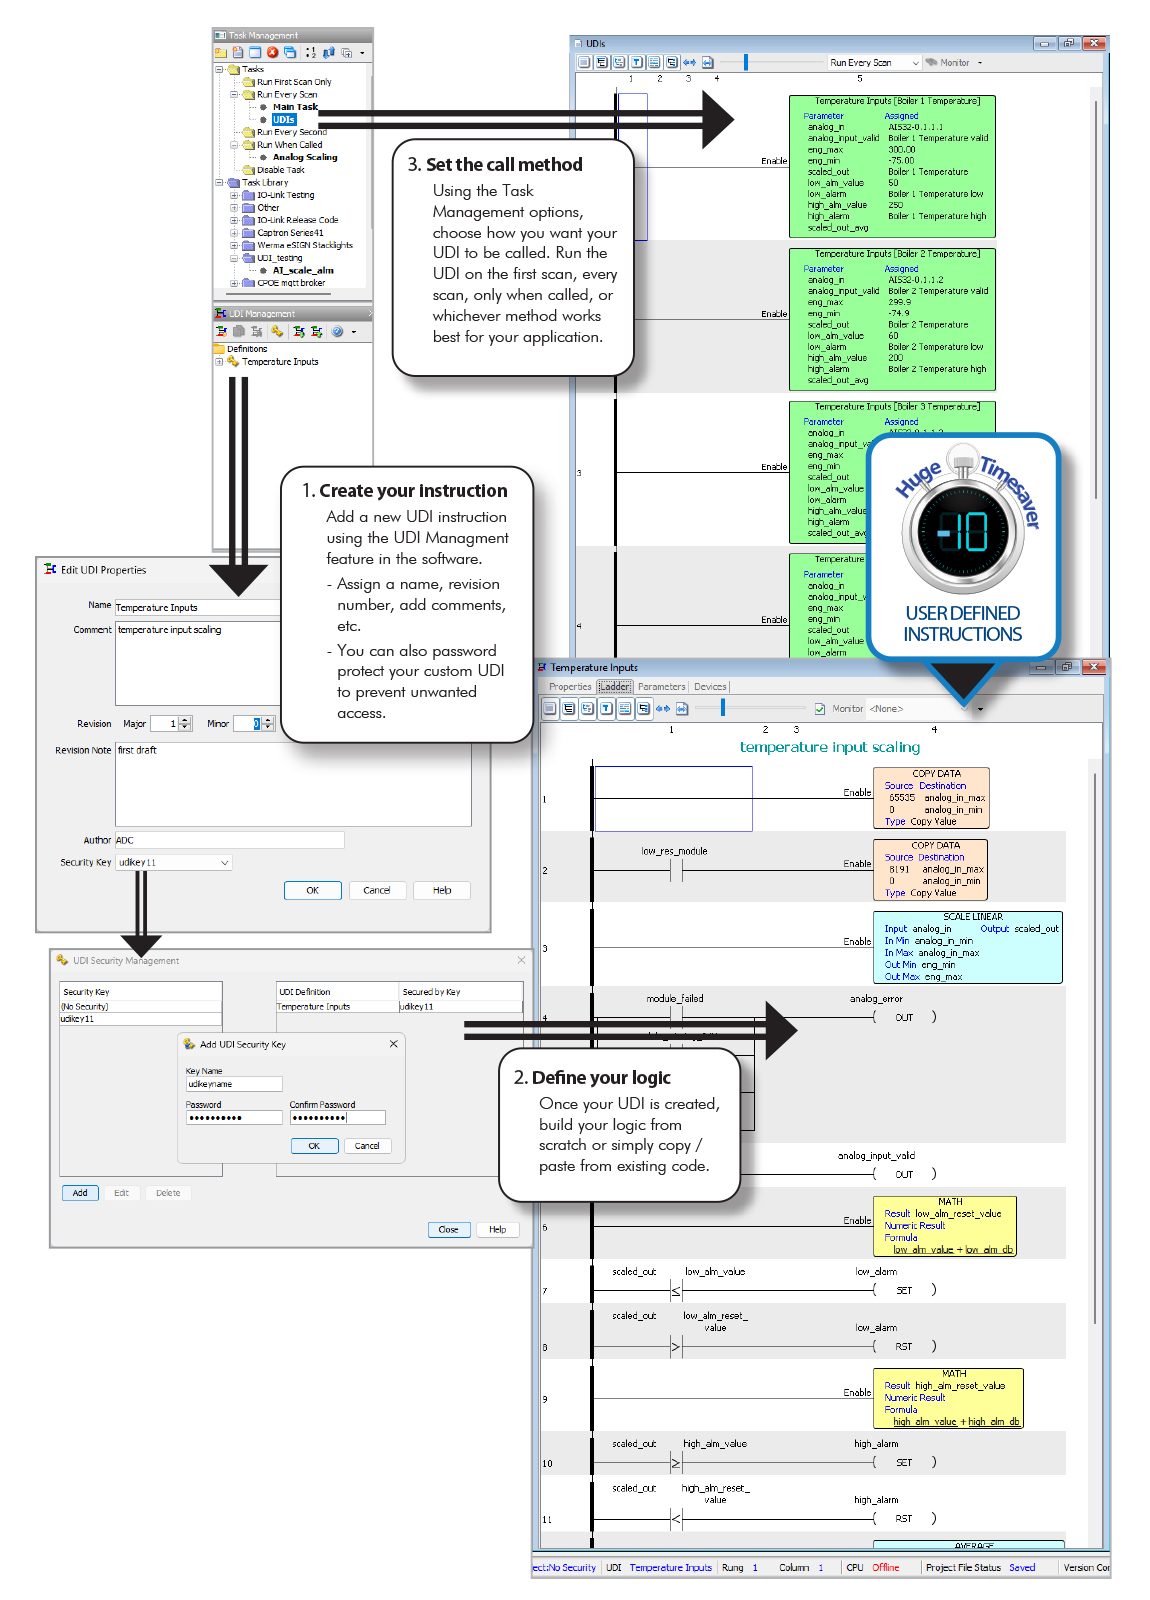
User-defined Instructions
Simplify your programming, boost efficiency, and standardize your logic with User-Defined Instructions (UDIs).
Instead of writing the same lines of code for every motor, valve, or component, you can create a single, custom instruction. This powerful feature lets you package complex logic into a reusable block, making your code:
- Easier to Read: Your main program becomes cleaner and easier to follow.
- Faster to Develop: Drag and drop your custom instructions instead of copying and pasting code.
- Simpler to Maintain: Update your logic in one place, and the changes apply everywhere.
With Productivity Suite's UDIs you can build a smarter, more consistent control system that's a breeze to manage.
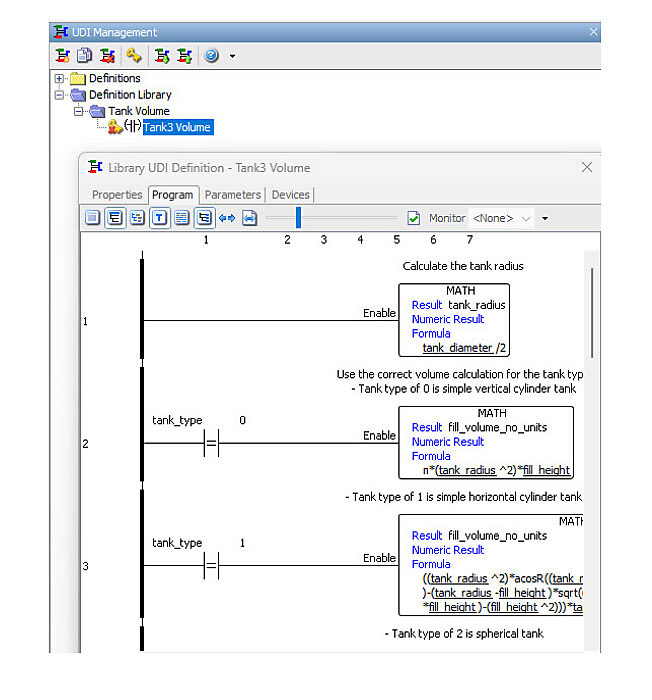
UDI Library
UDI Libraries enable engineers to build, organize, and reuse proven data structures across projects - saving time, reducing errors, and driving standardization.
Key Benefits of UDI Libraries:
- Faster development time - Store commonly used UDI definitions in centralized library groups and quickly add them to new or existing projects.
- Consistent standards - By grouping and managing definitions in a shared library, teams can enforce consistent naming, structure, and usage of UDIs across multiple machines, lines, or facilities, eliminating -one-off- variations that complicate maintenance and troubleshooting.
- Easy sharing and portability - UDI Library groups can be exported as .udi files and imported into other systems, allowing easy sharing of common data models between engineers, departments, or even customers and OEM partners.
- Supports modular, scalable PLC design - With reusable, well-defined UDIs, Productivity PLC systems are easier to scale, modify, and maintain over time.
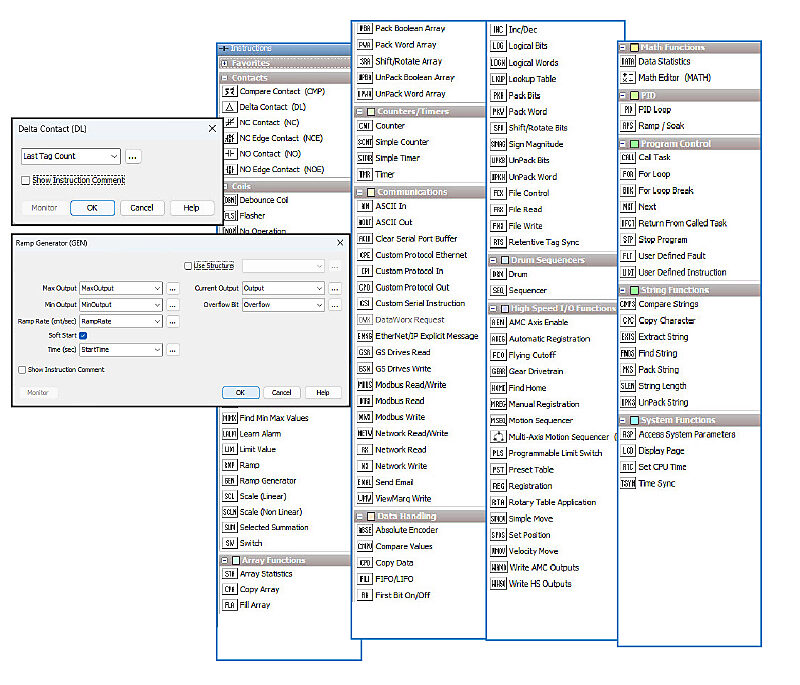
Ready-to-Use Instructions
Productivity PLC software includes a comprehensive list of drag-and-drop instructions designed to make programming fast, intuitive, and efficient. From various contacts, including Delta and Compare contacts, to advanced application and communication functions, Productivity has them all. Simply select the instruction you need and drop it into your program, configure the instruction using the user-friendly dialog, and you are done. Productivity's instruction set helps reduce development time, minimize errors, and get machines up and running faster.
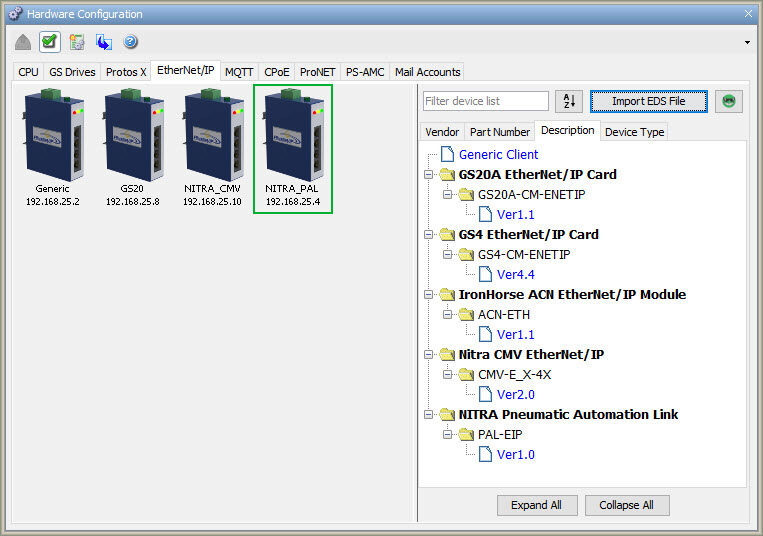
Easy EtherNet/IP
Productivity Suite makes communicating with EtherNet/IP devices a snap.
- Scanner and adapter supported
- Implicit application types supported include input-only and listen-only
- EDS file configuration presented in an easy-to-use drop-down menu
- Ability to select multiple connection options from an EDS file which simplifies configuration
- The EDS file library offers an easy way to upload, store, and manage your EDS files
- AutomationDirect.com EtherNet/IP EDS files are preloaded in the library for convenience
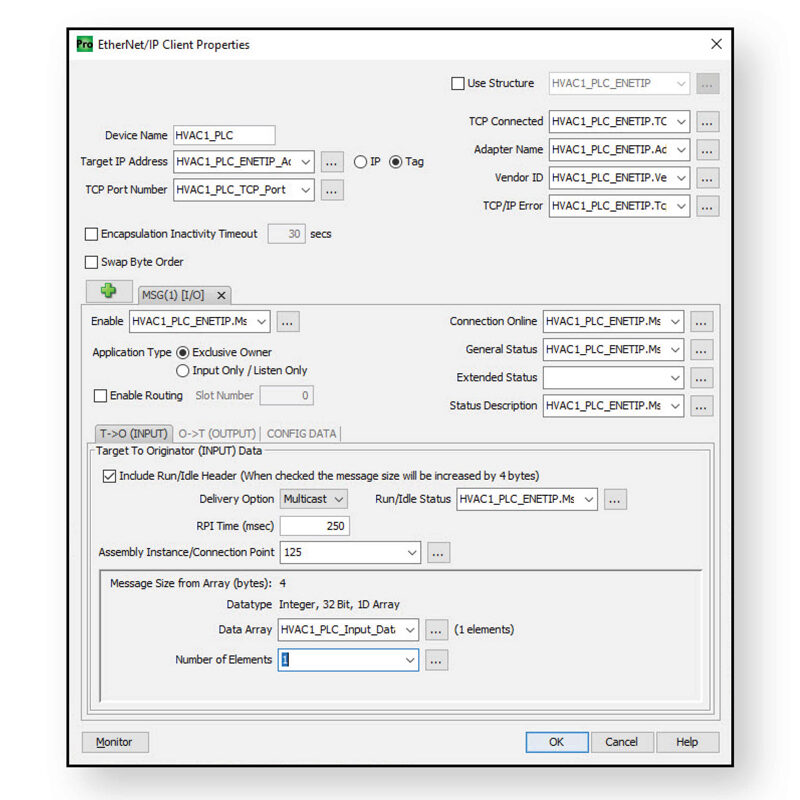
Variable Communication
Productivity Suite provides utmost flexibility when it comes to PLC communication and with the Variable Communications Instructions (VCIs), you can reconfigure your communication links with simple tag value changes. By using tags in the parameter fields of Modbus, serial, EtherNet/IP, MQTT(S), etc. configurations, you can dynamically modify the messages, target IP addresses, and other connection parameters from the ladder code or directly from a connected HMI.
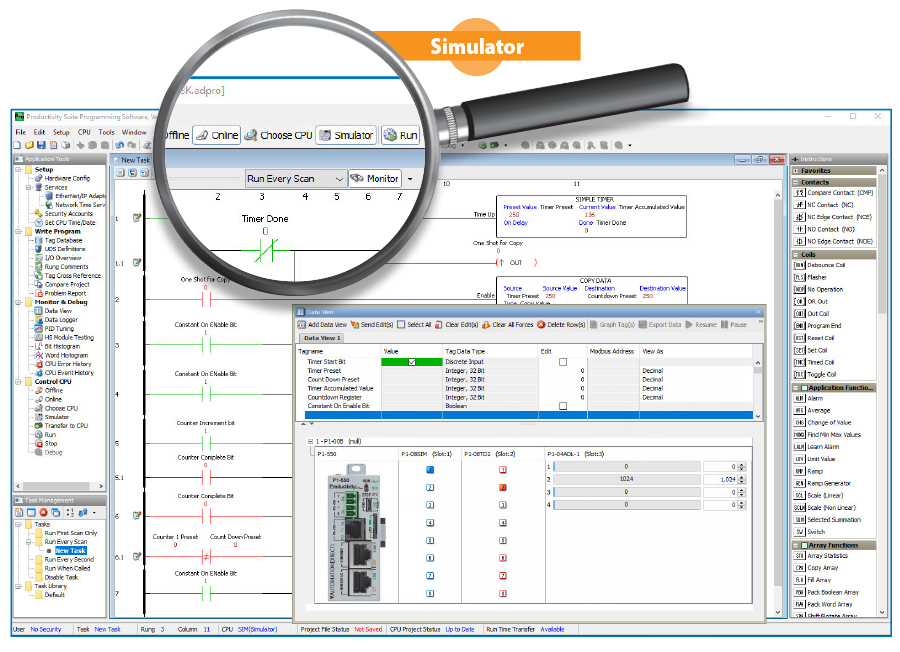
Why wait, when you can simulate!
There is no better way to get a head start on project development than building code ahead of time with the assistance of a project simulator. Now you can start your logic early and verify its operation even before the hardware has arrived!
Simply select the "Simulator" option in the toolbar, transfer your code as you would with a real CPU, turn on monitoring and/or open a Data View window, and start testing your code. This tool will come in handy not only with new builds but also when maintaining existing systems.
With the Productivity Suite simulator you can verify the effects of code changes before implementation, replicate fault conditions to test code stability, or try out new programming techniques/methods for greater efficiency. This can jump-start your project development on the front end and reduce unexpected errors with systems that are already live.
Simulator supports:- Analog or Discrete I/O simulation
- Data View monitoring
- Modbus TCP/IP, EtherNet/IP and CPoE (custom protocol over Ethernet)
- Ignores unsupported instructions
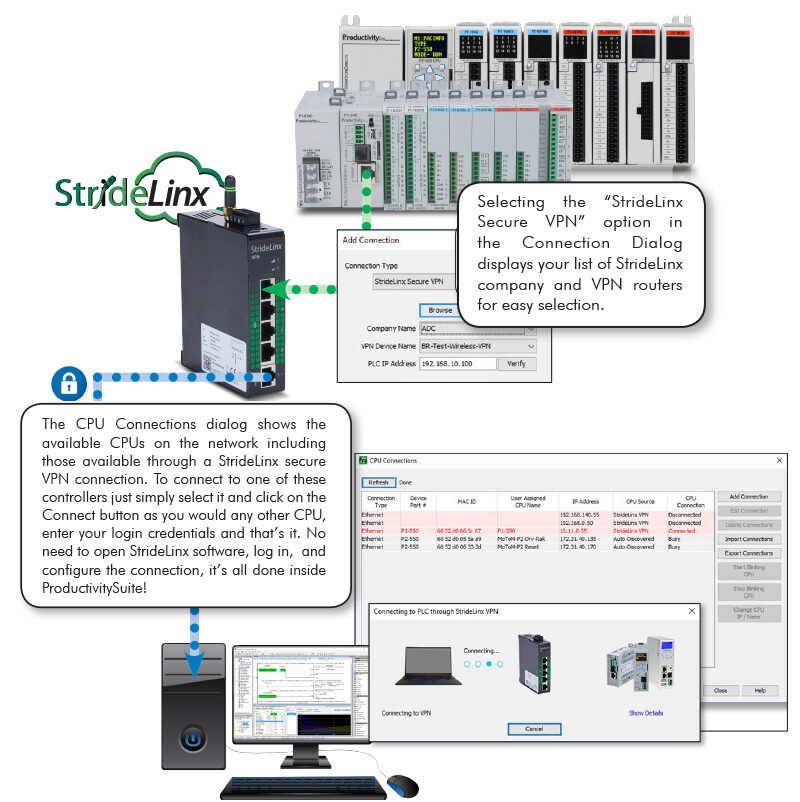
Secure VPN integration
Cyber security is an important part of modern day control systems and ProductivitySuite makes connecting to your remote PLCs through a StrideLinx secure VPN much easier. StrideLinx provides end-to-end secure remote connections using wired, wireless and/or 4G LTE capable VPN routers. ProductivitySuite makes it simple to securely connect to remote PLCs using StrideLinx by incorporating StrideLinx connection options directly into ProductivitySuite's Connection Dialog.
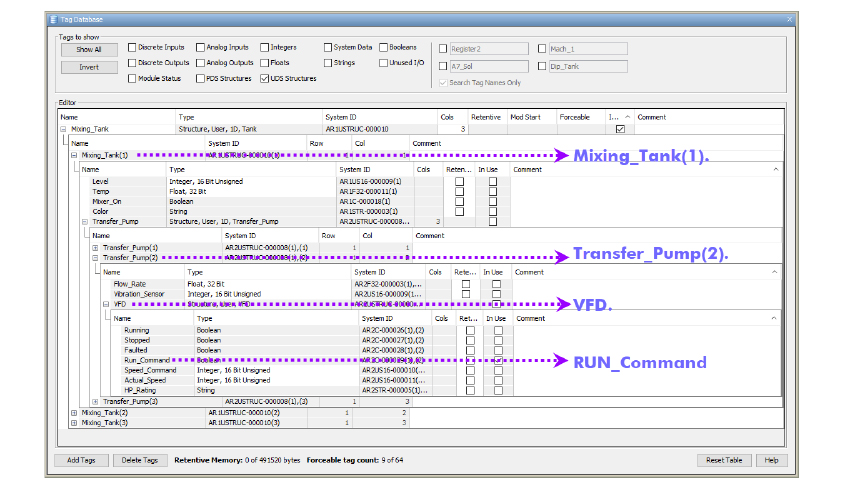
Advanced user defined structures
User defined structures (UDS) are a powerful tool that helps speed up program development and improve uniformity of your logic. A UDS is a group of data types (BOOL, FLOAT, INT, pre-defined structures, etc.) which are defined by the user and re-used at will.
Productivity Suite allows you to embed arrays within the UDS definition, as well as, create arrays of structured tags so that you can programmatically index through your tag variables.
For example:
Mixing_Tank(1).Transfer_Pump(2).VFD.RUN_Command which contains two nested UDS arrays (Transfer_Pump and VFD) inside the Mixing_Tank UDS definition.
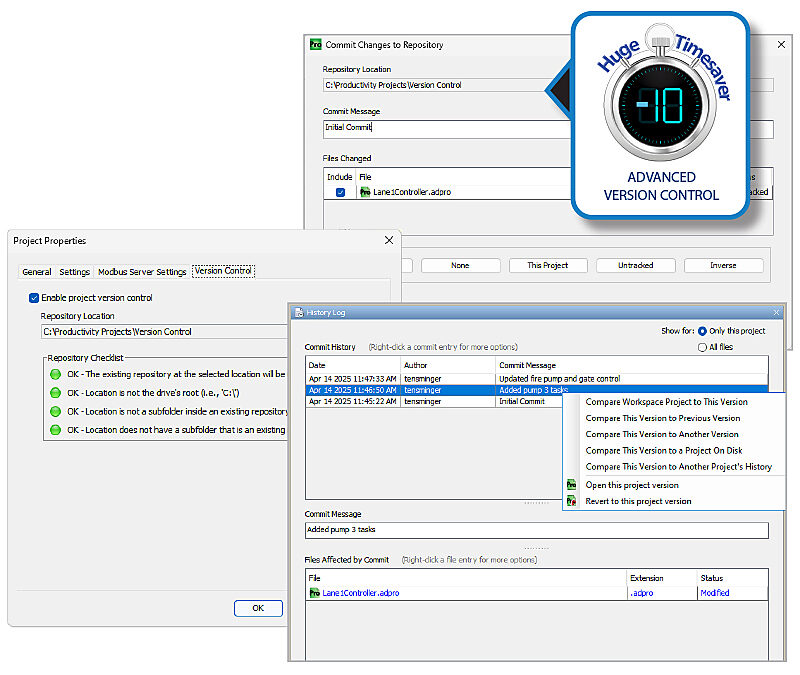
Advanced version control
Never lose track of who made what changes to what program and when. With the advanced version control in Productivity Suite, you can organize all of your PLC project versions in a Git repository and easily track any modifications to your projects, commit new changes, compare different versions, and even revert to a previous version if needed.
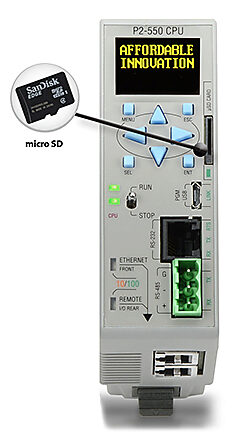
Built-in data logging
Knowledge is power, especially when troubleshooting! Having historical data available to you when trying to find or correct an issue can make a huge difference. The micro SD card or USB slot on the Productivity CPU allows you to log up to 32GB of tag data. This data is saved in .csv format on a removable micro SD card or USB pen drive and can be easily downloaded to your PC or the most current data log can be emailed via the Send Email instruction.
You can also utilize the web server capabilities of the Productivity CPU or the multiple file handling instructions to obtain the data:
File Handling Instructions
Productivity Suite offers several file handling instructions so you can access vital data, on-the-fly, from within the ladder code.
- FRX (File Read) can read data from .csv files on the CPU external storage device into the ladder code
- FWX (File Write) can write data from ladder code to .csv files on the CPU external storage device
- FCX (File Control) can check file size, search for a file, copy a file, and delete a file on the CPU external storage device
- RTS (Retentive Tag Sync) can save retentive tag values to or restore retentive tag values from the CPU external storage device
*Supported by all Px-622 and P1-412 CPUs as well as P1-M412 and P1-M622 Mini series PLCs
Web Server
Access data files and system tags remotely from any web browser, anywhere! The secure password protected login prevents unwanted access and keeps data safe. With the Productivity CPU's integrated Web Server you can access Data Logger files stored on an installed flash device (optional) as well as monitor system status via the (read-only) System Tags.
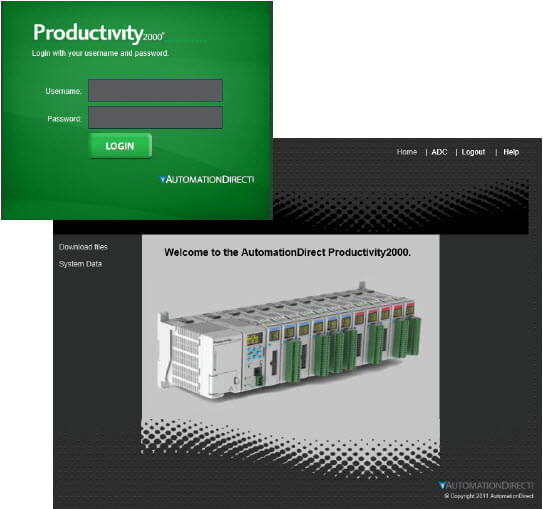
Secure Login:
Set your Username & Password to prevent unwanted access
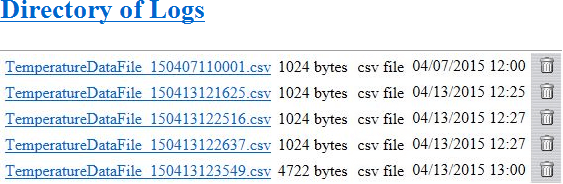
Main Screen:
Once you have accessed the CPU's internal webpages, select the Download files (user-defined data logging files) or the list of System data categories for viewing.
Accessing Data Files:
With data logging capabilities built into the CPU, you can now access your PLC data from anywhere (with the proper connectivity provisions and security considerations). Simply configure your CPUs data logger to store files to the removable micro SD card and enable the Web Server from your CPU's hardware configuration page.
The data log files are presented in a directory based on the file names and the frequency of archive you select when configuring the Data Logger. From the Web browser you can easily manage these files. You have the options of viewing, saving or deleting the files from the flash device. Also, when you select the "Log System Errors" in the Data Logger, you gain access to the Error log file.
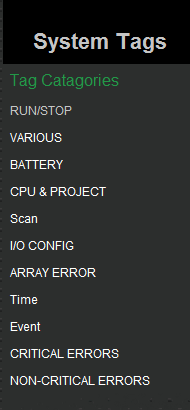
Accessing System Tags:
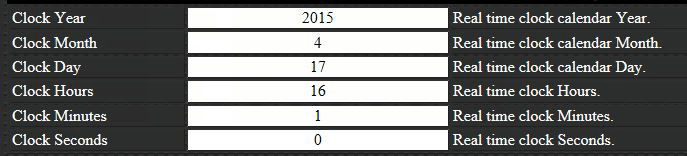
When you select the System Data option from the Web server main screen you have access to all read only System tags in the CPU. These are divided into the categories shown at right:
This example below shows the CPU Date & Time tags:
Easy Access Control
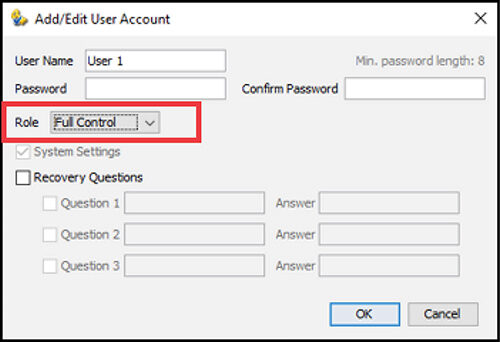
The Productivity Suite software has several remote access security features built in including project file encryption and user roles. User roles allow you to control who has access to the project file and what they can do with it. Full control, full monitor, limited monitor, and read only are some of the roles available and they can be easily set from the User Account dialog.
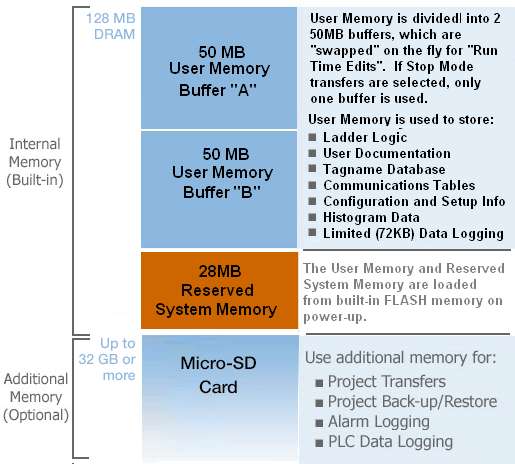
Up to 50Mb of User Memory
Store your entire project with ALL documentation in the CPU, and never hunt for that old laptop again. You know, the only one that has the updated code from last summer when you made all those changes.
Sure, we recommend that you make a back-up, but who hasn't been burned by this classic PLC problem?
Now you can download the free software to any available PC, grab the project (with documentation) from the Productivity CPU and you can quickly be productive with any required changes, updates, or troubleshooting.
Productivity CPU Memory Map:
Plug-and-Play Programming
Have you ever felt unproductive while configuring stop bits, parity, or baud rates in order to connect to a programmable controller? Most Productivity CPUs use USB programming for true plug-and-play functionality. Plug in your USB cable and move on to the productive activities like configuration and programming.
You can program across Ethernet as well, but we wanted Productivity PLCs to have a fast reliable way to get started. When combined with auto-discovery of I/O modules, the USB plug-and-play capability helps you be productive right away.

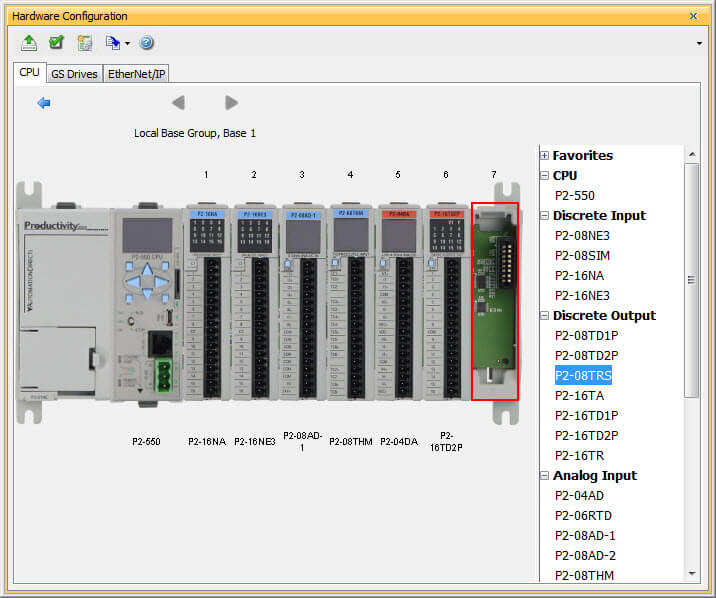
Quick and easy setup with Auto-Discovered I/O
Hardware setup has never been easier... or faster! Simply install each I/O module in the local or remote base(s) and it will be automatically discovered by the software. Physical I/O tags will be generated based on the module's position in the base (and the base's position in the system) and that's it! You are free to program with the auto-configured settings or reconfigure the setup and assign new tags manually.
Don't waste time laboriously entering I/O module part numbers into the system! Just install the modules in your rack(s), connect the programming cable, and the Productivity Suite software will automatically sense which modules you have installed, and configure your programming environment accordingly whenever a configuration update is requested. I/O tagnames are also automatically assigned.
Most Productivity PLCs even auto-discover VFDs
(click here for more details)
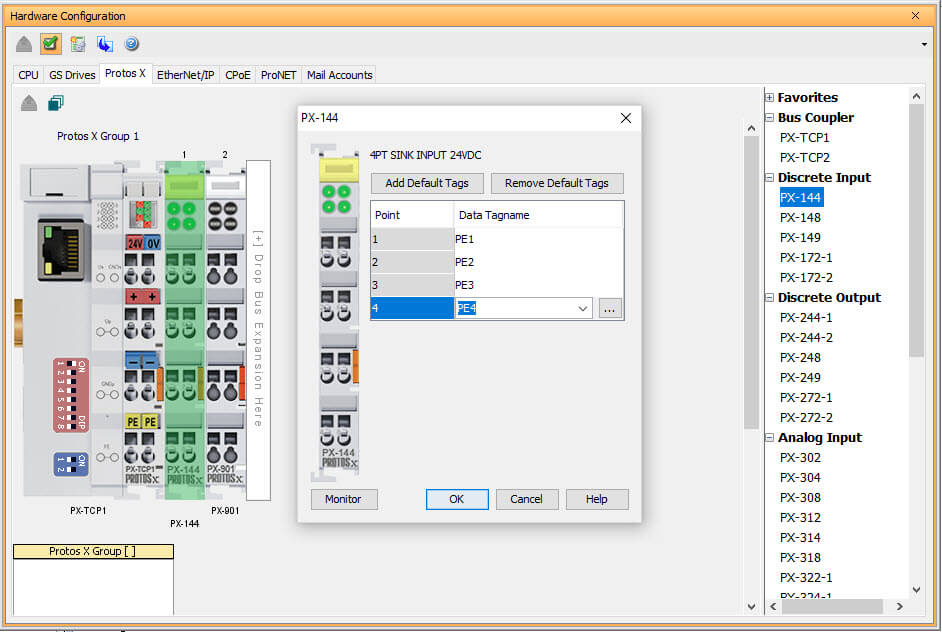
Auto-Discover Field I/O
The Protos X field I/O system has been integrated into the Productivity PLC's hardware configuration allowing for quick and easy setup of your field I/O points (requires Remote I/O port). You can read in your field I/O configuration with a click of a button, modify as needed, and save the configuration with your PLC project.
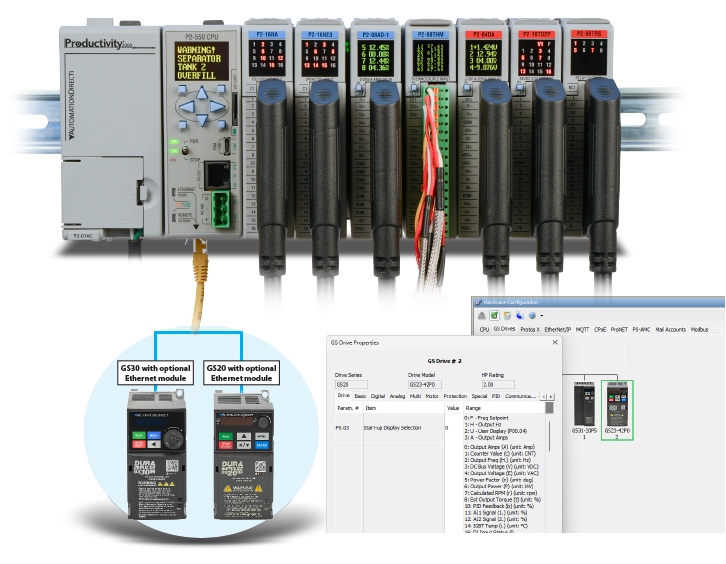
Auto-Discover GS Series drives
When connected to the P1000, P2000 or P3000 CPU's Remote I/O port via an Ethernet connection, GS series drives are auto-discovered in the controller's hardware configuration. All drive parameters can then be edited from within the Productivity Suite software. The system can also be configured to write these parameters to the drive with each program transfer, making troubleshooting and replacement in the field a cinch!
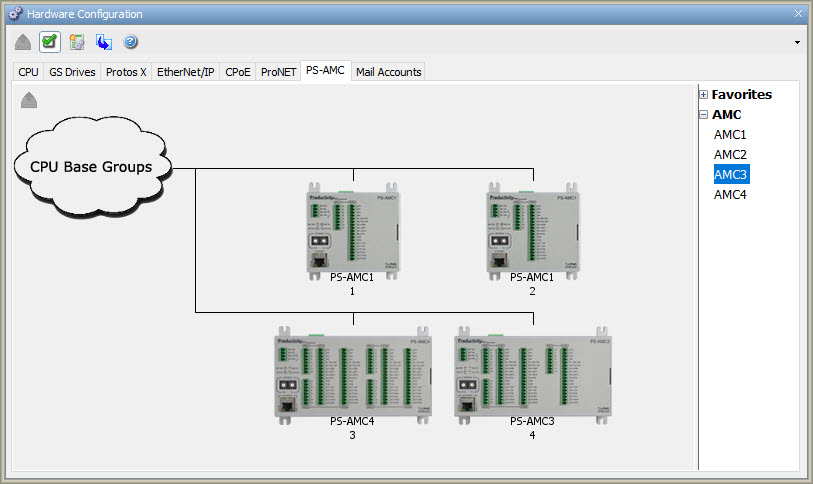
Auto-discover PS-AMC motion controllers and program with ease
Connect up to four PS-AMC motion controllers to your Productivity CPU (dependant on CPU chosen) and they will automatically be added to the hardware configuration for that CPU.
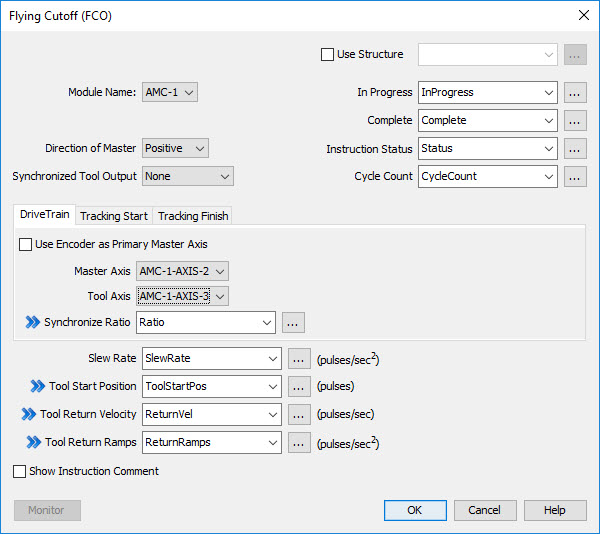
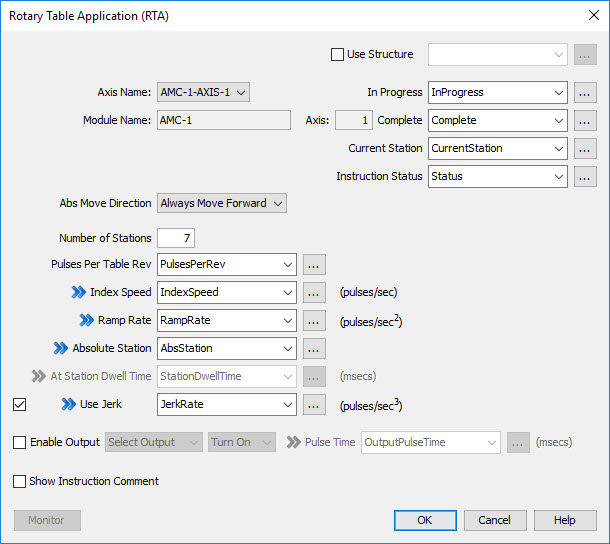
In addition, Productivity Suite has numerous instructions designed into the software, including flying cut-off and rotary table instructions, that allow you to program complex, coordinated motion profiles in no time.
Comprehensive Help Files
You can browse the actual help files here. These are the same detailed help files available from within the software, with full details about each instruction and all aspects of the software environment.
Here is a sample screen:

Ethernet Programming
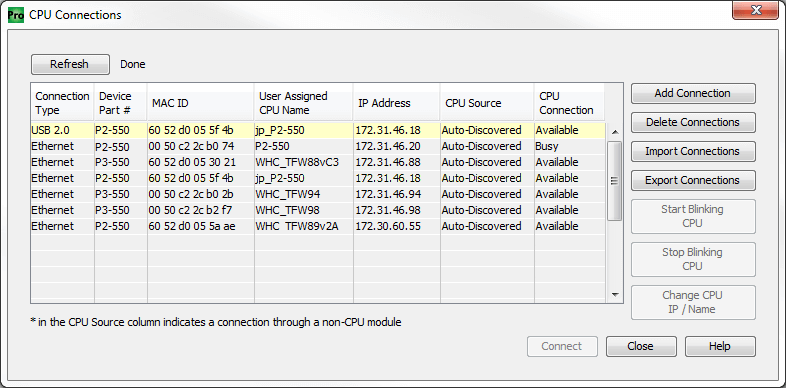
The Productivity Suite programming software supports both USB programming and Ethernet Programming. The PLC Connections dialog box (shown below) allows you to connect to any PLC on your network for programming or data monitoring operations. The PLC Connections dialog even dispays PLCs that are on other subnets, and will allow you to change the IP address and name of those PLCs so that you can connect to and program those as well. The "Blink CPU Display" buttons are a great way to make sure you are connected to the intended PLC, before risking a program transfer.
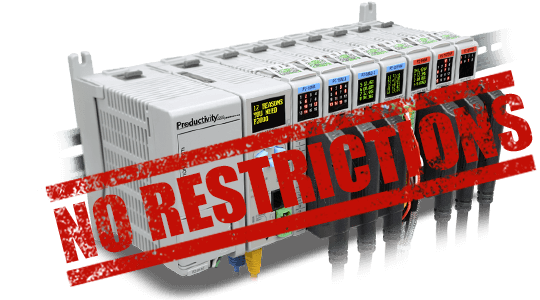
"No Problem" programming is programming without restrictions.
The Productivity series controllers are tag name based which allows for more freedom and flexibility than fixed-memory controllers.
- Does your application need 2000 timers but only 15 counters? No problem!
- Or maybe it needs 4000 real numbers and only 30 integers? No problem!
What about connectivity? No problem there either, with most Productivity CPUs you can choose to program via the Ethernet port or use the plug and play USB Port. Need to incorporate an HMI/SCADA interface? Problem solved! Easily import your tag database into HMI/SCADA software such as C-more for trouble-free development. Improved documentation, faster troubleshooting, reduced development time, easy setup and an overall better programming experience all at an unbeatable price!
No Arbitrary Limits Either:
The Productivity CPUs fast processor and programming environment free you from many arbitrary and fixed limits that many other PLC/PACs impose. With no practical limit on the number of PID loops, timer or counter commands, programmers are able to take full advantage of the power of your Productivity Series controller.
- No limits on PID loops*
- No limits on Counters*
- No limits on Timers*
*Limited only by the available memory in the PLC.
So you can be productive, not limited by your PLC software.
Learn more about the benefits of a tagname based controller.
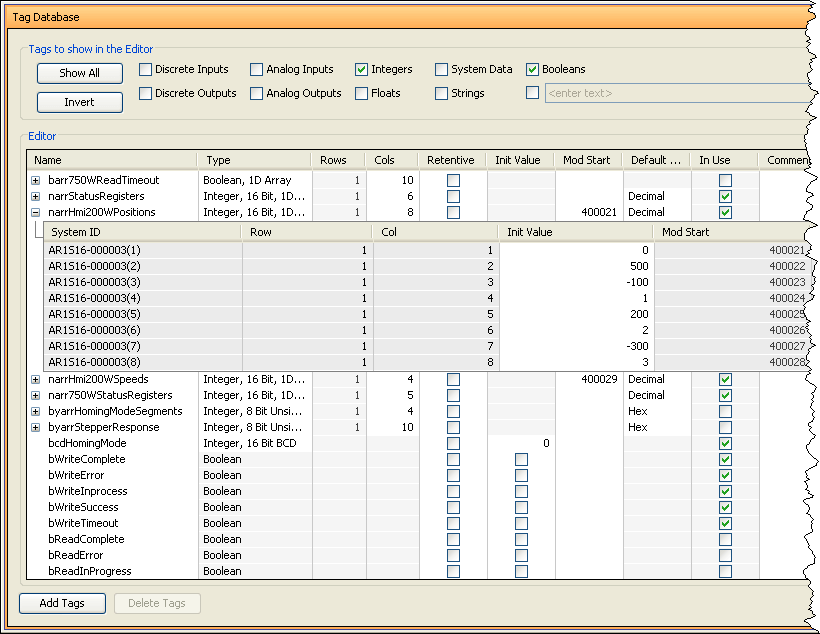
Tagname Based Programming
Reference your variables and I/O points with sensible names (tagnames) and make your program easier to understand. Add descriptive names as you program or enter all the tags before you even write one line of code.
Data memory ranges in the Productivity Suite are not fixed by data type. This efficiency allows you the freedom to define tagnames of any data type you need instead of having arbitrary blocks of wasted memory for data types you don't need.
While the Productivity Suite offers you the option to assign a logical name to your physical I/O points automatically when a module is selected (or auto-discovered), you can replace or augment these numerical rack, module, and point references with your own descriptive names at any time.
Export (and Import) your entire tagname database:
Perhaps you wish to connect to a C-more HMI Panel. You can export your entire tagname database, and import it into the HMI software – saving hours of typing and hunting for the correct tagname – and eliminating typographical errors that cause needless troubleshooting headaches.
Or maybe you would like to edit your tag database in a spreadsheet format – simply export it to .CSV format, make your changes, and then import the changes back into the Productivity Suite.
Benefits of a tagname based controller:
More descriptive naming:
- When creating tags, you're essentially documenting your process.
More flexible design
- You decide how the memory is defined. Timer, Counters, Floating point values, signed or unsigned integers, internal registers, etc. You are not restricted by the boundaries or "memory map" set forth by the vendor for each fixed address controller.
Easier to troubleshoot:
- X15, I:4/3, C200, B3:0/2 mean very little with respect to your process or machine...
- However, 'System Start_PB1', 'Auto Mode_SW1' or 'Batch Seq_Enabled' are very clear and concise.
- These are common descriptors (or labels) that are added to a fixed-memory address (or used as a "comment") in non-tagname based systems.
- A tagname based controller simply incorporates these descriptions/labels as the Tagname.
Better naming conventions result in an easier to understand and better documented program.
Shared tag name database:
- Create once, then use it multiple times. This results in huge time savings.
- Import/export to a .csv file for easy editing and share w/ HMI, SCADA, etc. to eliminate an additional step in your development process.
- No complex calculations to determine Modbus addresses. With a tag name controller, you assign them as you need them.
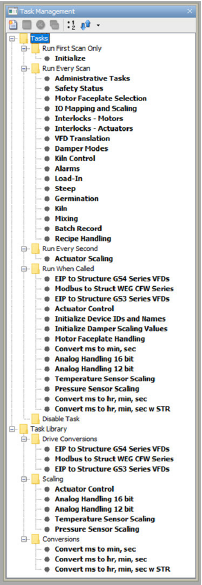
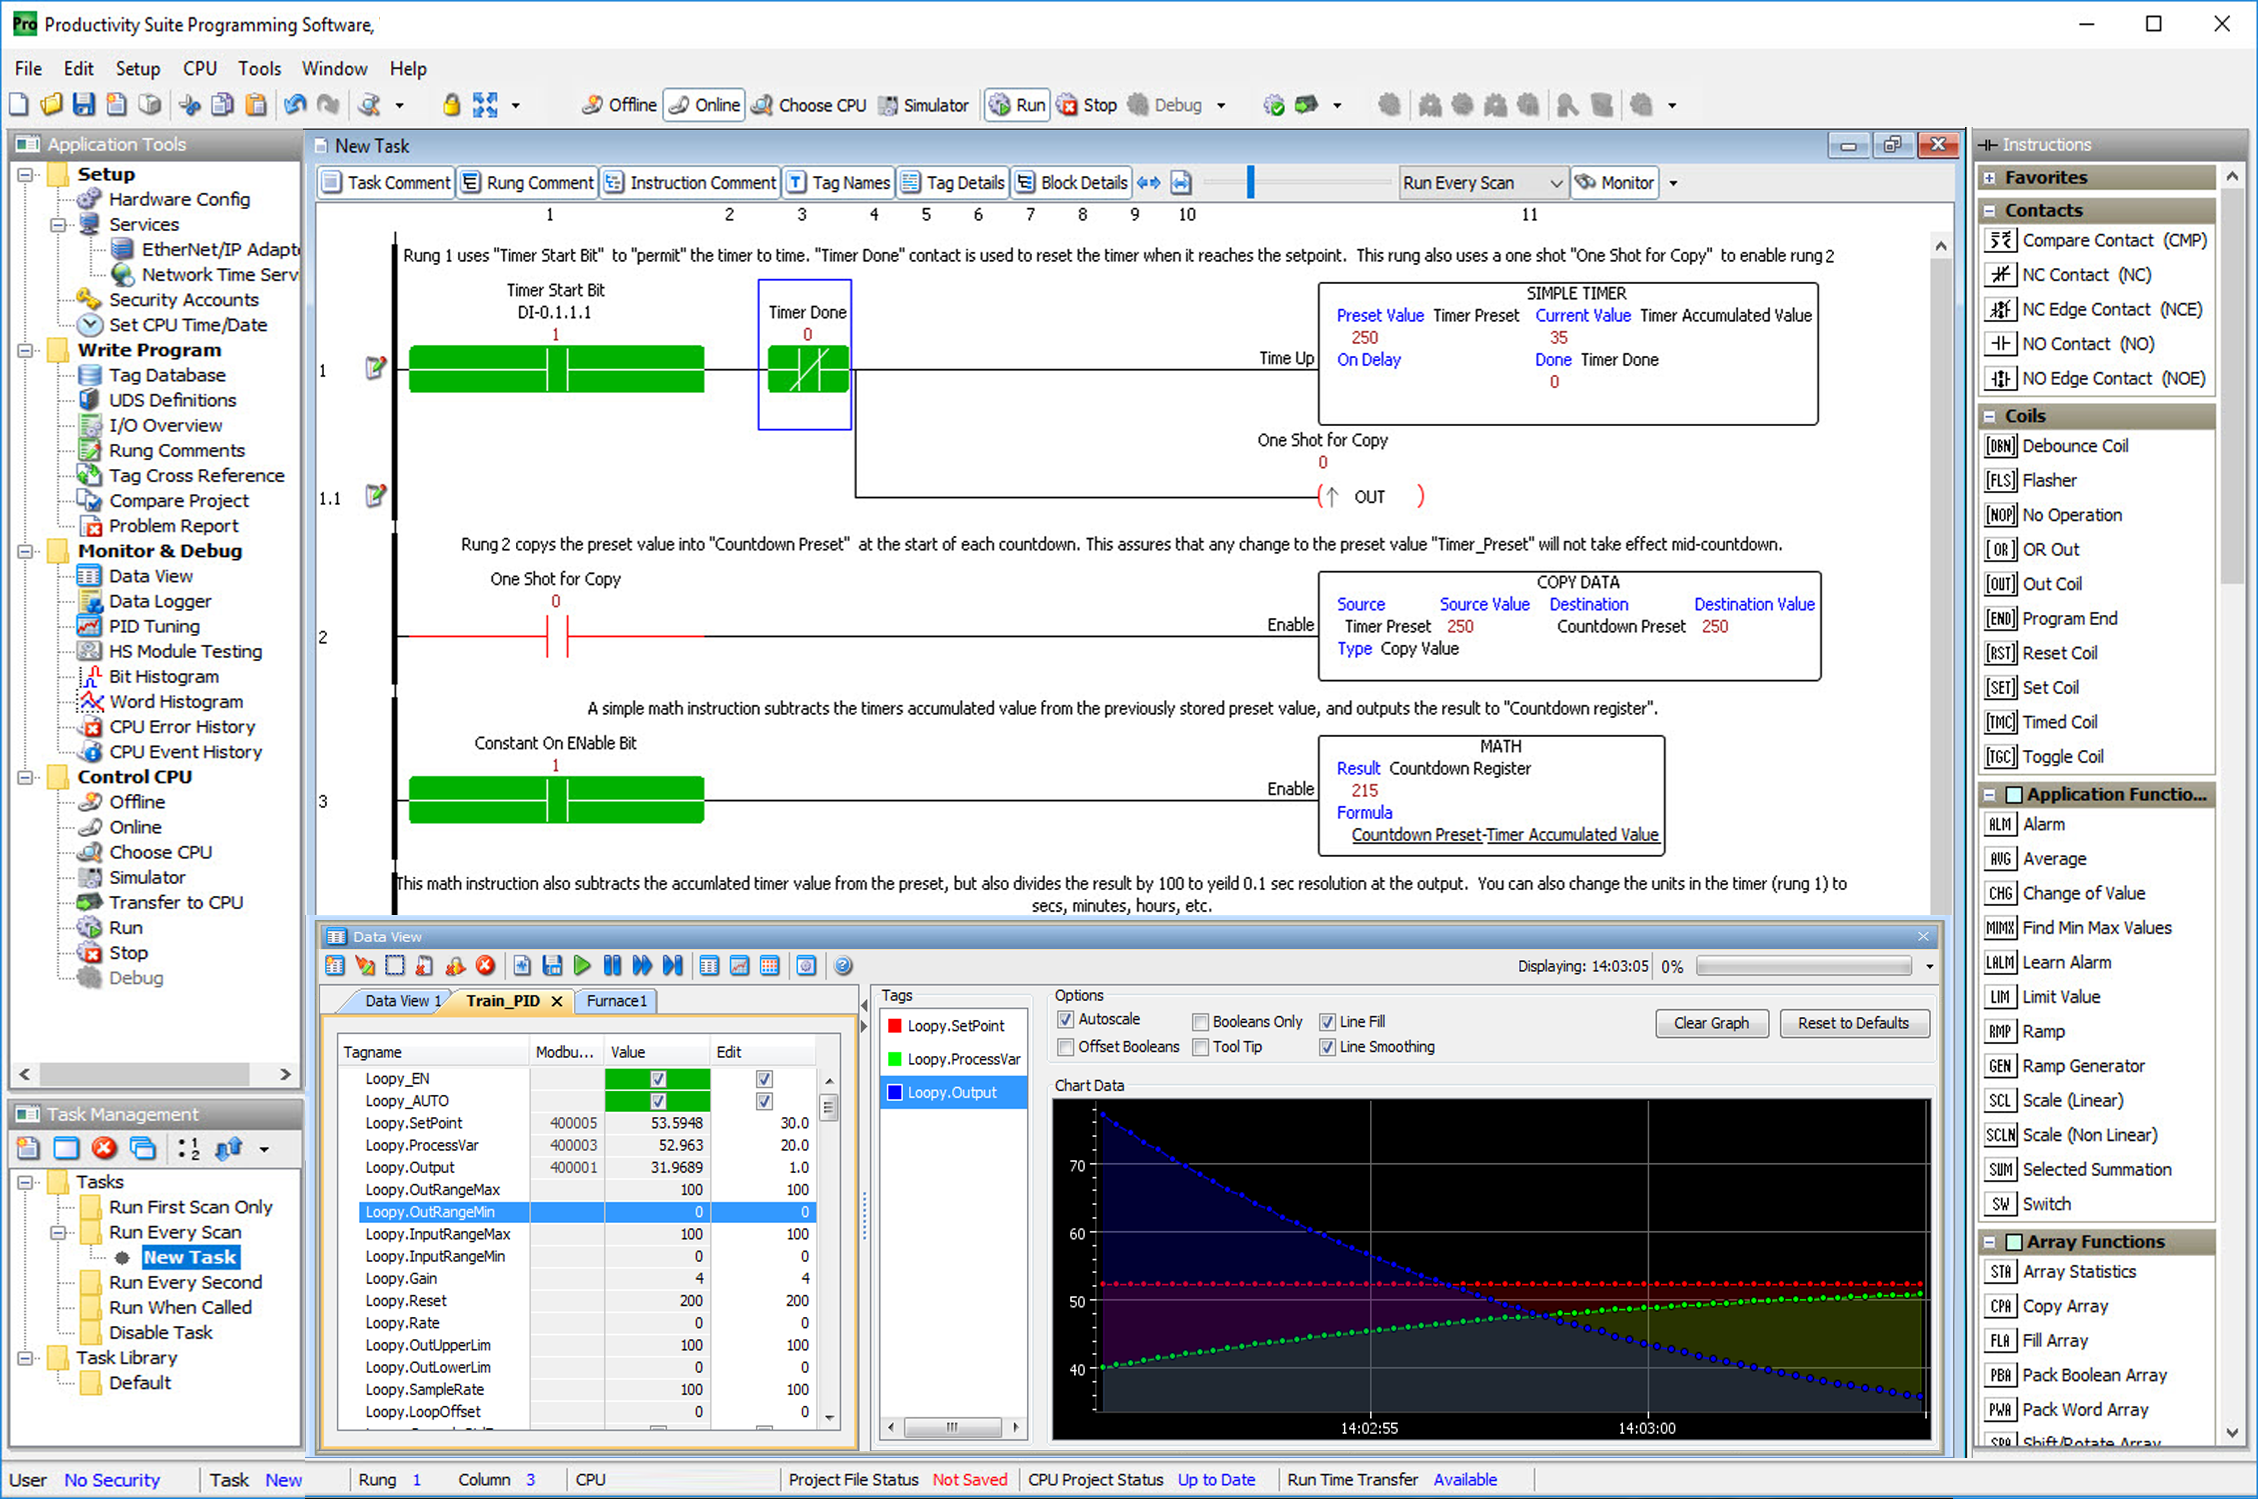
Powerful Task Manager
Have you ever had to write custom ladder logic to get a section of code to only execute periodically and not every scan? Or code that only needs to run on the first scan? What about code that runs multiple times per scan?
With the Productivity Suite Task Manager you simply break up your ladder logic into separate tasks and then drag them into the appropriate categories. In the screen shot to the left, the task (or ladder logic routine) "Initialize" has been placed in the "Run First Scan Only" category, and will only execute once at start-up.
The task "Convert ms to min, sec" has been placed in the "Run When Called" category, and can be used multiple times throughout the scan. Use the Task Library to reuse code or keep actions consistent between projects. Got a clever way of doing something? Save the task to the library for later, and import it into a new program as needed. Productivity Suite even imports any included UDS you've made to make integration a snap!
Combined with the ability to make run-time edits, the Task Manager is a powerful coding and debugging tool. Keep a task in the "disabled" category while you are developing it, and then drag it into the "Run Every Scan" to test it. Place data collection and other periodic tasks in the "Run Every Second" category and improve the scan time of your main routine.
Give it a try - we think you'll agree - the Task Manager offers true productivity enhancement.
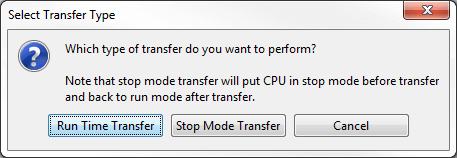
Run-time edits
Commissioning or troubleshooting a system can be less time-consuming if you can make program edits on the fly. Download edits to the CPU without pausing I/O updates or stopping/restarting the program. From melting rubber to making paper, you can keep your process running, avoiding downtime and product waste.
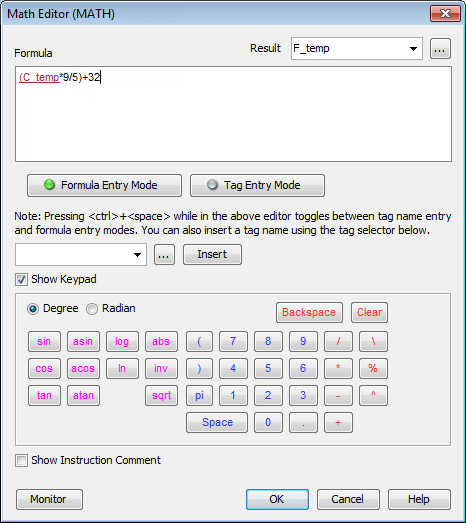
Nimble Math Instructions
The Productivity Suite makes mathematical operations a cinch. Simply type your formula into the formula box area, or use the calculator style keypad to enter equations. Insert tagnames wherever they are needed, and make sure to enter a tagname for the result. You can type the tagnames or use the tagname chooser to look up a specific tag and insert it. How much more productive could this make you?
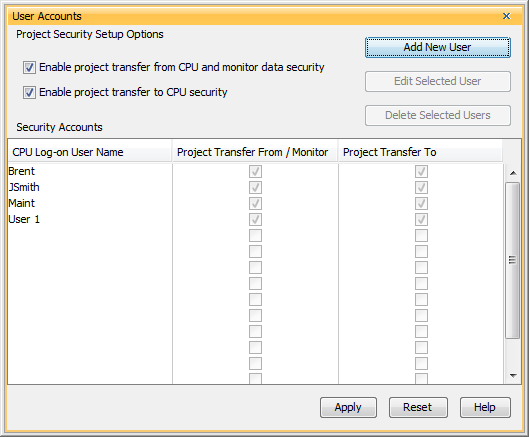
Multi-Level Security Options
Need to secure your Productivity PLC? Enable the two security options, and create the desired user accounts. You can allow users to read the project and monitor data only, and/or allow them to transfer projects into the PLC (make changes). Manage the user accounts independently, or quickly turn the security levels on and off globally for all users.
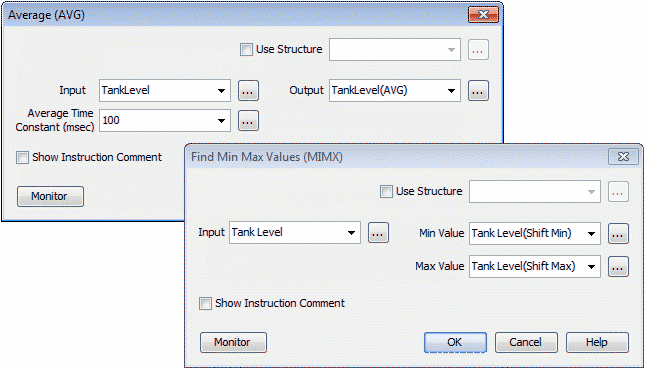
Application Specific Instructions
In Productivity Suite there are so many time-saving instructions, even application-specific instructions like Flying Cutoff, and they all have one thing in common - their "fill-in-the-blank" programming method. This method makes it easy to configure tasks that used to require a whole bunch of program code. With Productivity Suite you just fill in the blanks. How productive is that! This style of programming is offered for even the more complex functions - coordinated motion profiles, array functions, communications, PID, the list goes on and on.
In this non-linear scaling example, the volume of the cylindrical tank needs to be determined based on the measured height of the fluid:
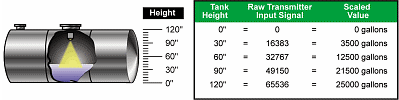
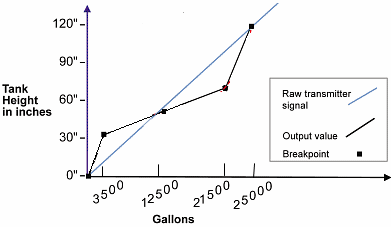
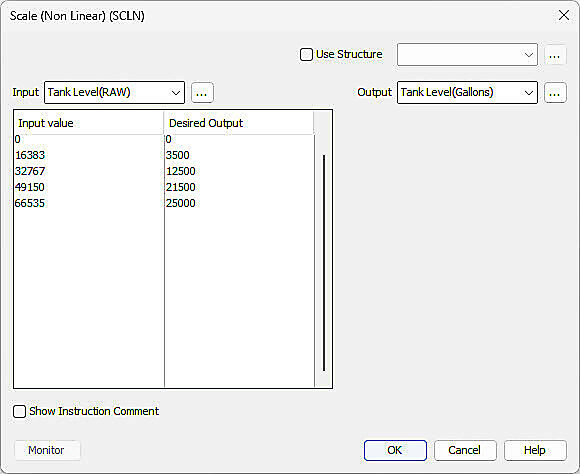
With the SCLN instruction it's a simple matter to enter a few pairs of values, and the Productivity Suite interpolates between the points:
Of course with this particular example additional pairs of values could be used to improve the accuracy of the conversion.
Perfect match for C-More HMIs!
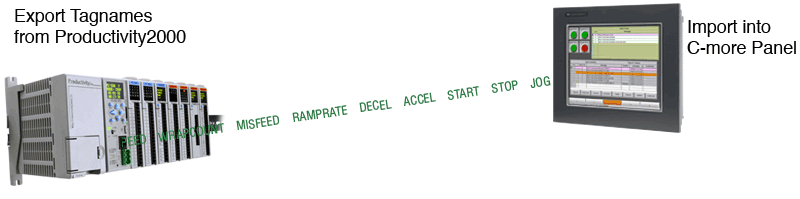
Export your tagname database from the Productivity CPU and import it into your C-more HMI Panel or to jumpstart your HMI development. No more digging through your notes, or hunting through your ladder logic to find the right tagname.
Connect up to 16 C-more HMIs to the Productivity CPU via Ethernet for control and visibility of your process/machine from anywhere in your factory. Use the remote access feature of C-more to view (and possibly control) your system from anywhere via the Internet. C-more offers a wealth of productive features that make it a perfect match for the Productivity PLC. More about C-more here.
FREE Software Download
That's right, we offer the Productivity Suite programming Software as a free download. It's the full package - no restrictions - no limitations.
We want you to see how the Productivity Suite can enhance your productivity. So go ahead, download the software and take a look. From the auto-discovery of your I/O modules and VFDs to the Application Specific instructions, we've put our decades of programmable controller software experience and all of your great customer suggestions and feedback into the Productivity Suite. Give it a try, and let us know what you think.
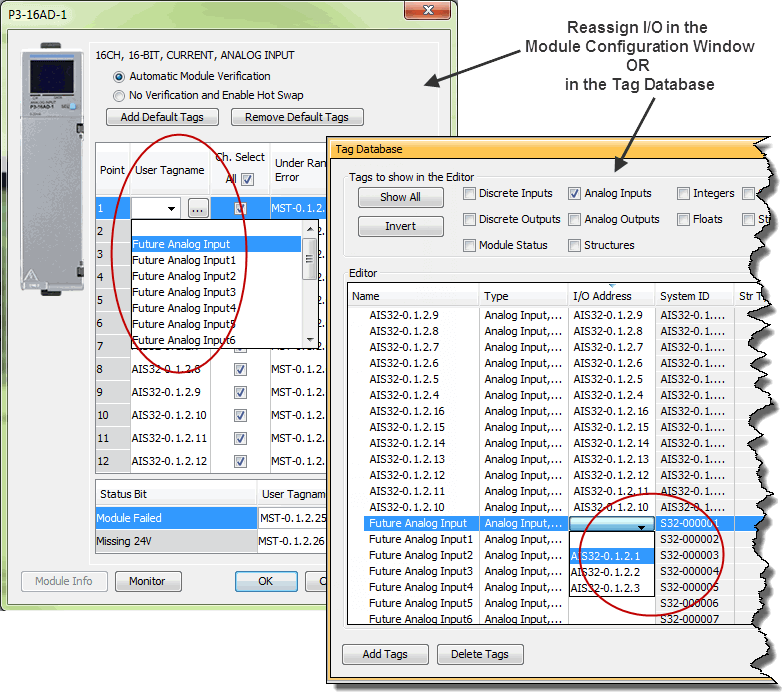
Tag I/O Reassignment
Tag I/O Reassignment allows a user to create tags, at will, without knowing what I/O modules are (or will be) installed in the system. Users can create tags, then later reassign these tags to I/O points at any time (assuming that the modules have been configured in the Hardware Configuration). Tags can be reassigned in the tag database OR in the module configuration window.
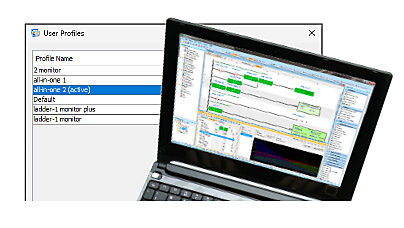
Convenient user profiles
Like most automation industry professionals you are probably on the go, sharing your time between the office and the factory floor or field installation. With Productivity Suite's user profiles, you can easily switch your programming environment between one configured for a multiple monitor office setup to an in-the-field commissioning one ideal for working on a laptop.